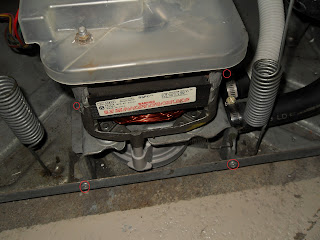
I then popped the front panel off by pushing the the two tabs at the top of the panel inward and down. I then had her turn the machine back on while I took a look. I noticed that the belt was moving and the basket was also moving, which ruled out a broken belt. However, the fact that it wasn't pumping out any water was the concern, since the pump on this particular model (Speed Queen AWN393L) is a direct drive pump that pumps as a result of the belt moving. I assumed that the pump was either clogged or shot, and because the girlfriend was freaking out about it, I told her I would take the rest of it apart the following day when she was not here to harass me.
On the following day, I removed the motor assembly which the pump is attached to. This is extremely easy to do on this machine, as it only has four 7/16" nuts securing the assembly to the frame. However, there are a few things you want to do before trying to remove it. Obviously, you are going to want to unplug the washing machine. After that is done, you will see an electrical harness with several colored wires plugged into the top left side of the motor. Push the tab in that's on the top of the harness and pull it out, laying the harness to the left and out of the way.
Finally, it is necessary to remove the drain hoses from the pump in order to get it out, which I did after I emptied the water out of the basket using a cup. Make sure you have a bucket on hand when you disconnect the drain hoses, as there will be water inside and it will get everywhere. Luckily, I have a drain in the floor right in front of the washer, so I just disconnected the hoses and directed them toward the drain. The drain hoses are connected using standard hose clamps, you only need a flat-head screwdriver to loosen them. Loosen them one at a time and remove the hose from the pump inlet/outlet and drain the water into your bucket.
After the hoses are removed, you are ready to unbolt the motor assembly. Get your ratchet with extension bar out and take out the four 7/16" bolts.There are 2 on the front of the frame and 2 on either side of the assembly near the back. You will be able to see the rear right bolt once the hoses are removed.
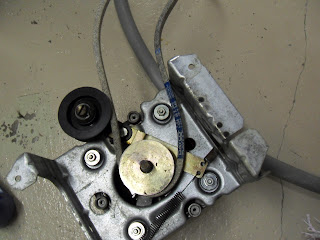
After you have removed them, push the assembly toward the rear of the washer a few inches, as this will loosen the belt from the pulley on the basket. You can now reach behind the assembly and pull the belt off the pulley. The belt may catch on the bolt at the bottom of the pulley as you are removing the assembly, just go slowly and keep an eye on it. The assembly should now be free and clear of the washing machine. At this point, make sure you pay attention to the way the belt is routed on the motor if it looks like it needs replaced. The belt you see in this pic did not fit, it was slightly larger than what I needed. This picture was also taken after the pump had been removed.
This photo shows the original belt (right) and the new belt I purchased at CarQuest that fit perfectly. It ran about $15. As you can see, the belt on the right is pretty much fuxored. Yay, I used an Internets word!
You are now going to remove the pump from the motor assembly, which is held into place with 3 screws. On this particular pump, they used 1/8th inch hex head screws, which require a special bit. If you buy any halfway decent screwdriver bit package at your local hardware store, it will probably have one in it. I recommend purchasing a security bit package that has an assortment of bits that will also work on security screws. You can pick one up for less than $10. I purchased the pump locally for $42 at Dayco Appliance Parts, but you can order one for about $25 shipped on Amazon if you don't mind waiting a few days.
Once the screws on the pump are removed, the pump just pulls away from the shaft on the motor. As you can see here, the old pump is completely screwed because the shaft has bored out the notch it is supposed to fit into, which allows the shaft to turn both the belt and the pump mechanism at the same time.
Anyway, just put everything back together in reverse order and you are done. Here is a quick breakdown so you don't have to scroll back and reference as you go:
1. Make sure the belt goes on first and is routed correctly.
2. Attach the pump, making sure the motor shaft is seated correctly in the hole on the pump and then screw it into place.
3.Put the motor back inside, attaching the belt to the pulley on the basket and then securing the motor assembly with the 4 bolts.
4.Attach the hoses to the pump.
5. Attach the electrical harness to the motor.
6. Plug in the washer and test by going to the spin cycle. If the drum spins, test the pump by running a small load.
7. Replace front cover.
8. Hopefully reap sexual rewards from your significant other.


